Background

Tuesday, February 24, 2015

10 Kid-Inspired Garden Activities for Winter

Gardening takes a lot of work, caring, and patience- all virtues every human being should learn while in their youth.  In the high mountains deserts of the Wild West, we can't garden outside easily in the winter. Our winter here is generally below zero, foggy, and a bit dreary (except this year).  Winter doesn't have to be all dreary, though. There are some lovely garden activities you can do now with your kids, while you wait for the weather to warm the soil.  Here's some of what we've done...

10 Kid-Inspired Garden Activities for Winter

#1 Buy some fun seeds!
Maybe you could order something online like watermelon radishes or pineapple tomatillos, like we did.  Winter is a good time to order your seeds so that you have time to plan and start them indoors before spring planting.
Watermelon Radish

#2 Read A Little Garden Calendar for Boys and Girls!It's a classic book that's in the public domain, so it's free to read online.  It's not only an entertaining read, it's educational!


#3 Check out some fun books about gardening from your local library to read together.  "Creepy Carrots" was a fun read for us.

#4 Grow an indoor plant and learn to care for it.
Jade and other succulents are hardy, and good for beginners to grow.
We got our jade starts from my aunt.

#5 Grow green onions from the store.  After you use the green tops of the green onions, just stick the white root end into water (we've used a baby food jar) and set in on your windowsill.  You'll have new growth that you can keep harvesting in the weeks to come.
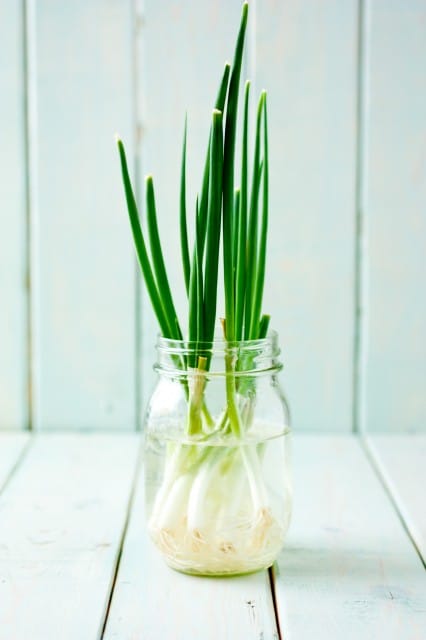
photo from cookingclassy.com

photo from northcarolinacharm.com

#6 Cook together using preserved veggies from last year!  Last night we used the last of our frozen pureed Hubbard Squash to make 2-ingredient "Pumpkin" Bread!  All you need is spice cake mix and 1 1/2 cups pureed squash (about the same capacity of a can of pumpkin).  Mix it until it comes together into a thick batter and put it in a greased bread pan.  Bake at 350F for 45 minutes or until toothpick inserted into center comes out clean.

#7 Grow alfalfa sprouts! 
 
They only take 3 days to grow, and they taste great in salads or on sandwiches.  All you need is alfalfa seeds, a jar with a lid that allows for good drainage, and a paper bag.

#8 Make cute garden markers!
We simply collected rocks and painted them white.  When they were dry, we used permanent markers to write the plant names.  These won't blow away in the wind!
 

#9 Start a garden blog!
My kids and I enjoy blogging together.  It makes the gardening experience more engaging and the kids get a real sense of accomplishment when they can show and tell.  Sometimes my daughter can be found blogging on our tablet, out in the garden, under the shade of a golf umbrella!

 #10  Get outside and dig out some weeds when a day permits!
We've had an unusually warm winter, and we were able to get out and weed just a couple weeks ago.  If you are blessed with a warm day, make use of it.  If you start digging up weeds before the bugs and the bees are alive and working it's more enjoyable, at least for these three tame dames!

Sharing at:

Tuesday Garden Party

Make-Your-Own Alfalfa Sprouts

As a kid, my dad used to buy alfalfa sprouts in the square package at the grocery store every time he would make chicken teriyaki sandwiches. Mmmm...Just thinking about them gets me salivating...grilled chicken topped with slices of cucumber and a pile of alfalfa sprouts drizzled with teriyaki glaze on a soft hamburger bun.  Yum!  The sprouts served a special purpose though, they tangled together to form a perfect nest for the teriyaki glaze to seep onto, and instead of the sauce sliding right off the sandwich, it held perfectly in place so each bite had sauce.  The sprouts also had a nice fresh flavor and added a bit of a crunch to the sandwich. 

When I married my husband, his father taught me how to make my own alfalfa sprouts. It only took three days and it was very little work, just a little rinse and drain a couple times a day. Plus, growing your own gives you an even fresher product. So today, I share with you what he taught me.

 
To make your own alfalfa sprouts, you'll need the following:

  • Quart jar, or larger, with a draining lid, screen, cheesecloth, or sieve that provides thorough drainage
  • Paper Bag or Towel
  • 1/3 glass jar full of water
  • 1 Tbsp. alfalfa seed
  1.  Mix seed and water in the glass jar and let sit 8 hours in the dark (overnight). 
  2. Drain and rinse and drain again.  Leave jar tipped slightly on it's mouth and propped in that position to allow good drainage, and cover with a paper bag so it remains dark.  I like to leave it propped in my dish drainer.  
  3. Rinse 2 times per day, drain, and keep under bag.  In 2-3 days, when sprouts are 1"- 1&1/2" long and yellow leaves are starting to sprout, uncover and let the sun bring chlorophyll to the leaves (6 hours or so), being careful not to burn or cook the sprouts.  
  That's it!  Store them in a refrigerator and enjoy on sandwiches and salads!  Makes approximately 3 cups of sprouts, loosely packed.

My grilled chicken salad for lunch yesterday had alfalfa sprouts!
I drizzled it with my favorite poppyseed dressing.


Sharing:
Tuesday Garden Party,
The Gathering Spot
Tuesdays with a Twist

Wednesday, February 11, 2015

Oh my gosh! Trees in the Flower Bed Must Come Out!

Who did you think cut down this tree in the flower bed?  It was me and mom!

Garden Planning: Learning From the Plants

 
As I'm planning for our upcoming garden this year, I'm taking time to reflect on my garden successes and failures from last year.  I will take what my garden was trying to teach me last year and make changes.  It's important to learn from the plants.


Our family was committed to working hard for a garden last year.  We enjoyed the fruits of our successes like the homemade V8 and salsa we canned; the garden tomatoes, tomatillos, carrots, and potatoes that fed us through the end of that year; and who could forget the delicious chard and leeks in our pastas and soups?

And as was to be expected, we also learned plenty from our garden fails.  Maybe you can learn from our fails too, or offer us some advice how to fix the failures!

Garden Disappointments:
  • Onions- they just didn't grow big and they weren't worth the space they took up.  It's my second year trying them and they never developed a large bulb.  I'm done with those.
  • Garlic- they died off completely.  I had never grown those before, but they were given to me as an Easter gift, so I stuck them in the ground and hoped for the best.  Later, I came across an article that said they should be planted in the fall and be harvested the next year.  Oops.
  • Beets- our seeds were getting old, and only about 20% germinated, but my kids count that as a win, since they didn't care for the beets that did grow.  When I was their age, I LOVED beets, so I'm hoping their tastebuds will change because I still love beets and plan to eat them the rest of my life.
  • Parsnips- these seeds were brand new, but only about 10% of what we planted germinated!  I think we got 2 or 3 parsnips, but what we did get, we loved and would definitely try growing them again
  • Bell Peppers- I sowed these seeds directly into the soil as soon as it was warm enough and they just didn't mature fast enough.  I read online that it's a good idea to plant them closer together than what is listed on the seed package.  I'm not so sure that was wise.  The only peppers I got that matured were a handful of jalapenos, and that was from 26 pepper plants (5 different varieties) in a 4x4 foot area. 
  • Snake/Swan Gourds: We grew these for tame dame #3 and planted 12 seeds in a hill, only to have one germinate (and these were brand new seeds as well).  The one that germinated looked ill, but surprisingly a couple months later was actually growing.  Unfortunately it got too late of a start and none of the fruits matured enough to be used, even as decorations.
  • Butternut Squash- These were old seeds, maybe 6 years or so, and I got 2 plants to germinate, but only got one good squash to eat.  One.  From 2 plants.  I'm not sure why?  Any ideas?
  • Spinach- these seeds were as old as the butternut seeds, but some still germinated, not many.  And just as we'd get ready to pick some, the plant would bolt.  I needed to start these earlier and sow heavier.
  • Green Globe Artichokes- I was hoping and hoping for a good harvest of these, so I started the plants indoors before spring even set in, but it turned out that they needed longer.  They all died before they produced any fruit, plus, they probably needed more cold days than what I gave them.

Garden Successes
  • Leeks- these were also given to us as an Easter gift, and they were so easy to grow.  They just did their thing, and we harvested lots.  They took up very little space, and they were a nice variation in our meals.  I'd use them in place of onions in a lot of recipes for pastas, sauces, salads, etc.  Our favorite was the potato and leek soup.
  • Chard- what can I say?  This plant always does well with little to no effort.  It is a substitute for recipes using kale.  My hubby and I like it roasted with olive oil and salt, but we also like it in soups and sauteed with a little garlic.  My kids will hopefully like this one someday.
  • Radishes- we sowed seeds heavily because they were so old, and we got excellent germination.  We started thinning seedlings every few days after 2 weeks and ate the immature bulbs (Tame Dame #2 loved these dipped in homemade ranch dressing).  Radishes are great for young gardeners because they grow quickly.  You've got ready to eat veggies by the end of the month.  
 

  • Tomatillos- we grew these just for fun and I had no idea what the plant was going to even look like when I stuck these seeds in the ground.  It was so fun to watch it grow and I learned so much.  The seeds and sprouts were so little, that I thought the seed package was exaggerating a bit when it said to allow 3-4 feet between plants.   So, I kept my 2 plants 2 feet apart.  After they grew up, they got big alright.  I didn't realize I needed to cage these to provide support, and the main stalk totally split, and half the plant was laying on the ground.  This plant also got attacked by tons of little beetles, I sprayed it hard with some water one day to get the little larvae off, but that was all the effort I put into pest control for this plant.  Surprisingly, the plant did awesome despite it's hardships in life, and it set forth these fancy little air balloons that eventually filled with the firm, sticky fruit.  As far as preservation goes, it's fairly simple.  They will last in their husks for a month or more in your fridge, or you can remove the husks, rinse the film off, and store them in gallon plastic zipper bags in your freezer.   I make Rachael Ray's "One Hot Pot" (Chile Verde) recipe with them and we eat it in burritos.  I'd like to try making a tomatillo ranch dressing that I've tasted before.
  • Tomatoes- I grew 8 plants: Romas, Baby Romas, Italian Paste, and Yellow Pear.  The Yellow Pear Tomatoes endured harshest wind and got some disease, and I ended up just pulling the entire plant.  The rest of the tomatoes thrived (except another one that got snapped at the base in the wind).  Our determinate plant did the best and every fruit was perfectly formed and large.  I missed the flavor of a good slicing tomato, though, so this year I'm going to grow an heirloom Brandywine variety as well.
  • Pumpkins- these were a chore to grow because of the squash bugs we were constantly fighting.  I tried diotomaceous earth, and then again.  But we finally won the war with my grandpa's advice of a little dish soap in water solution in a spray bottle and grooming each leaf and handpicking off the bugs and eggs.  We had to do this often- every few days or so.  Can I just say, thank goodness for garden gloves?  It was hard, nasty work, but we got a good harvest.  I grew too many, though.  2 hills with 2 plants each was more than we needed.  Also, I think I'd like to grow a different variety, like a Hubbard next time. 
  • Zucchini- 1 hill, 2 plants, and we fought the squash bugs here too, but we got a good harvest.  Next time, I'd keep just 1 plant to a hill and give it room to get bigger. 
  • Cucumbers- we grew 4 plants on one hill and grew them up a tomato cage.  They did pretty good that way.  The squash bugs didn't bother these ones as much.  We love cucumbers, so we really should've grown more.  We eat them all year long, and I wanted to make pickles, but I grew the wrong variety.  This year, I'm going to grow a pickling cucumber in addition to the other. 
  • Volunteer Cantalope- apparently my brother threw the remains of a cantalope into our garden beds last year, and I noticed the little sprouts when I was planting bell pepper seeds.  I didn't know what they were, but I transplanted them where they'd get water and have room to grow, since I thought they were a squash of some sort.  Then near the end of our harvest, we had a few ripe cantalope.  Those were the sweetest, juiciest melons I've ever sunk my teeth into.  I was sad we didn't have more ripe ones, but maybe we'll have more volunteers this year from the ones I left on the vines over winter?
  • Red Potatoes- a dear friend and neighbor gave us leftover seed potatoes and we buried them a foot apart and in trenches a foot deep and covered with 5-6 inches of soil.  Then as the plants got 6 inches tall, we covered them with more soil.  The prairie dogs burrowed through, and I thought that half our plants wouldn't make it, but they surprised me.  These were the favorite vegetable to harvest from the garden.  The kids loved it when I would dig up a dead looking plant and they could sift through the soil to find the potatoes.  I loved that they kept for awhile in my cool pantry.  I bet I could've kept even more in my garage and had them a few more months if I had grown that many.
    One of our potato patch vandals
  • Carrots- these were another fun to harvest veggie.  Each carrot would surprise us.  Some would be tiny, some would be big, some would have legs or noses.  Carrots are a dream for tired preservers!  They keep so long in the fridge.  We filled a gallon sized zipper bag and some of another with our harvest, and they were gone by mid-December.  I'd definitely grow more of these next time. 
  • Strawberries- our strawberry patch produces the tiniest berries that are so very sweet!  We never get enough of them.  If we could get a berry patch that gave us enough to preserve, that would be awesome!


I'm glad that last year's garden provided us good food and that it was a good teacher!


What are your plants to plant?  What have your plants taught you?

 http://anoregoncottage.com/wp-content/uploads/2015/02/CoHosted-Tuesday-Garden-Party_150.png

Monday, February 9, 2015

Weeds! I'll get you someday!

Our garden used to look like this:


And all the green then is brown now. More weeds have decided to make the garden bed their home. They grow and blow their seeds to get grown. The cycle begins. Grow and blow, grow and blow. It just goes on. Soon after a long rain (if we get any) we should start pulling all of them out!  The dirt will be soft. I remember when our yard has had not as many weeds. The battle will begin soon. Watch this blog and see when it happens! (It might be tomorrow or in 3 months)

Posted by: Tame Dame #2

http://anoregoncottage.com/wp-content/uploads/2015/02/CoHosted-Tuesday-Garden-Party_150.png

Sunday, February 8, 2015

Seeds Galore!

Posted by 7-year-old Tame Dame #3-

Seeds, seeds, and more seeds.  I got Sugar Baby Watermelon seeds in the mail yesterday!  Tame Dame # 2 got Watermelon Radishes!  Tame dame # 1 got Pickling Cucumbers and Pineapple Tomatillos.

Can I show you guys garden pics?  ok, sounds good.

One of the favorites of mine.

Good bye people!

Tuesday, February 3, 2015

Fun Seeds Ordered

It's my first time ordering seeds online.  I used Pinetree (superseeds.com), and I'm looking forward to getting my order in the next week or so.

Tame Dames #2 and #3 helped me pick out a few fun varieties to try in our garden this year.  Here's our picks:
Watermelon Radish
9-year-old Tame Dame #2:
Watermelon Radishes

If there was one thing Tame Dame #2 wanted to grow again, it was radishes.  This fun variety flip-flops the color, with the white on the outside, and the red on the inside.  When sliced into wedges, it sorta resembles watermelon!   The website says that these radishes are mild and sweet.  I'm truly interested to see the variation in flavor from the typical radishes that we grow!

7-year-old Tame Dame #3:
Sugar-baby Watermelon

This variety sounded yummy to our youngest gardener.  We sure hope with this being an earlier variety that we can harvest some while it's summer.  That's the hard thing about growing melons from seeds in this climate- sweet summer melons aren't usually ripe until the weather is threatening to freeze.


My picks:
Pineapple Tomatillos (ground cherries)

We grew some lovely green tomatillos last season, but these are nothing like those.  They are supposedly soft and sweet and can be eaten straight off the plant.  I love the little balloon husks that form on tomatillos before the fruits inside fully develop!  They look like little garden lanterns.


Brandywine Tomato

Last year, we grew 3 varieties of tomatoes (Roma, Italian Paste, and Yellow Pear).  Although I was happy with our harvest, the varieties that I grew were best for making salsa, and only so-so on the raw-tastiness scale.  So, I knew this year I wanted to grow a TASTY heirloom variety.  As I researched the web, Brandywine kept popping up as a favorite for flavor, so it's the one I picked.


National Pickling Cucumber
I wanted to make pickles last year, but being the novice gardener that I am, I grew the wrong kind of cucumbers for it.  Don't get me wrong, we enjoyed the cucumbers that we grew, but this year, I did my research and ordered seeds for a fabulous pickling cucumber (I hope).


With shipping and handling charges, these 5 seed packets came up to about $10.  Not bad, I think.
SUGAR BABY WATERMELON 442 1 $1.50
PINEAPPLE TOMATILLO (75 days) W591 1 $1.50
WATERMELON RADISH (37 days) 30601 1 $1.95
NATIONAL PICKLING CUCUMBER (52 days) 136 1 $1.25
BRANDYWINE TOMATO (80 days heirloom) 424 1 $1.75
Subtotal $7.95
Shipping & Handling $2.95
Discount (SITE12615) -$0.80
Grand Total $10.10


Have you ever grown any of our seed picks?

What are your favorite varieties to grow?


Sharing At Tuesday Garden Party